Monday, August 25, 2025
How to automate a Mastra Workflow in Lambda Using EventBridge

Introduction
The need to implement Gen AI has been steadily growing, with the greatest benefits seen in deploying Agents within workflows tailored to client-specific needs.
If our business logic and technological solutions are already deployed on AWS, it makes sense to implement a cloud solution that is as compatible as possible with this ecosystem.
Objective
This post aims to demonstrate the technical implementation of an AI agent within a workflow stage and its deployment as a Lambda function.
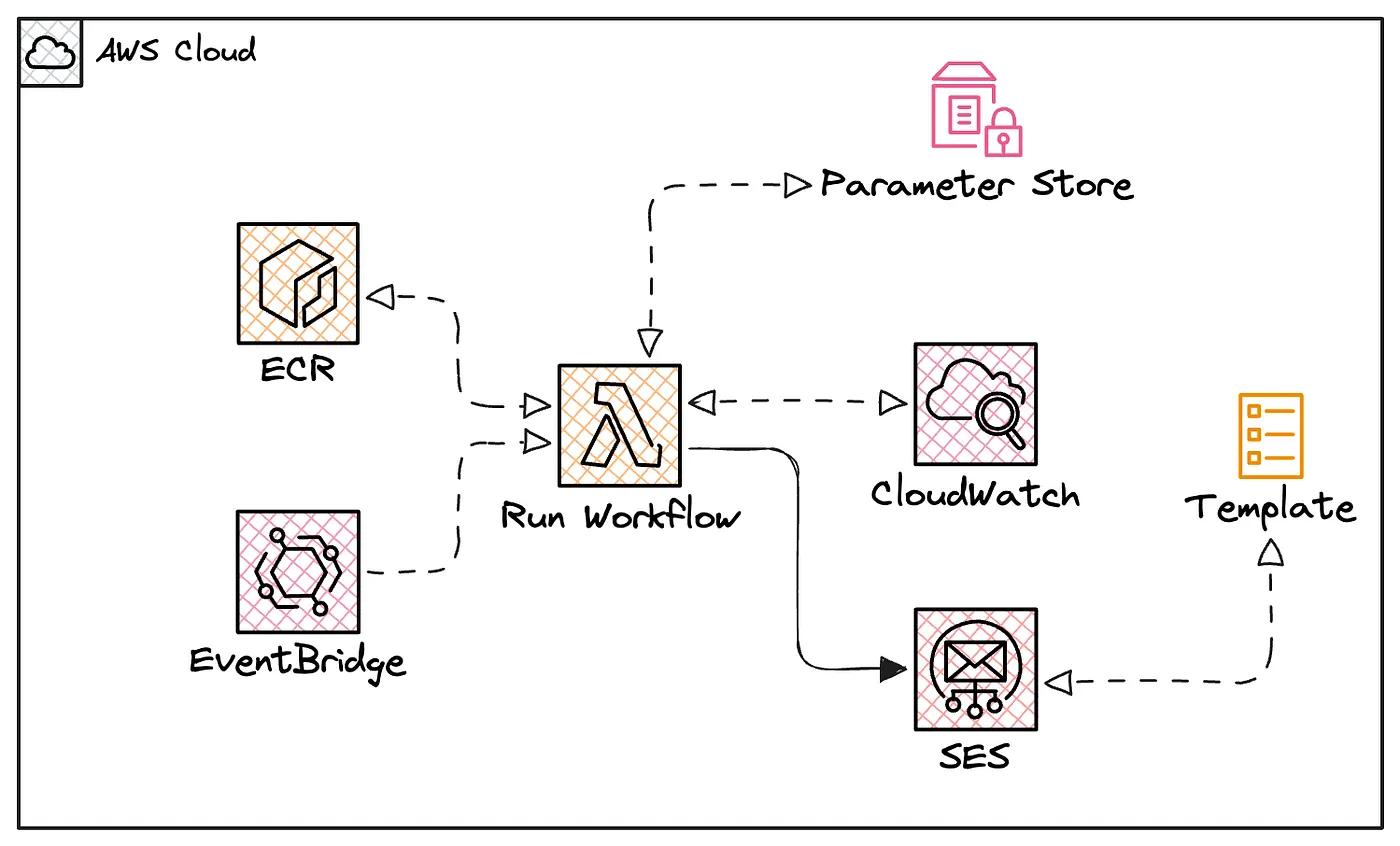
The following high-level diagram illustrates the final architecture.
Implementation
For workflow orchestration, I’ll be using Mastra.ai, a TypeScript Agent Framework that provides a range of features for efficient agentic workflow orchestration.
This post is not intended to dive into code implementation details, but rather to demonstrate agentic workflow orchestration in AWS.
TLDRS
You can still find the complete project code in the following GitHub repo.
Creating an Agent
Mastra allows us to create an agent responsible for generating text based on a given prompt.
The following code shows how we define an agent, and for this example, I’ll be using gemini-2.0-flash-exp.
// agent.ts
import { google } from '@ai-sdk/google';
import { Agent } from '@mastra/core/agent';
import prompt from './prompt';

export const reportAgent = new Agent({
  name: 'Report Agent',
  instructions: prompt,
  model: google('gemini-2.0-flash-exp')
});
Creating a Workflow
Mastra lets us create different types of flow control, allowing us to tailor the workflow to our specific business needs.
When you build a workflow, you typically break down operations into smaller tasks that can be linked and reused. Steps provide a structured way to manage these tasks by defining inputs, outputs, and execution logic.
In this use case, we’ll use the following steps:
- Fetch data: represents querying data from a source.
- Generate report: represents text generation via an agent.
- Send report: represents sending an email based on the data from the previous steps.
If this use case looks familiar, you can find it applied in another scenario here.
Next, the following code shows the implementation of the steps.
// workflow.ts
import { createWorkflow } from '@mastra/core/workflows';
import { z } from 'zod';
import { fetchData } from './fetchdata-step';
import { generateReport } from './generatereport-step';
import { sendReport } from './sendreport-step';

export const reportWorkflow = createWorkflow({
  id: 'report-workflow',
  inputSchema: z.object({}),
  outputSchema: z.object({}),
})
.then(fetchData)
.foreach(generateReport, { concurrency: 10 })
.then(sendReport)
.commit();
It’s important to note that Mastra allows us to use .foreach to iterate over the results of the fetchData function and then consolidate the iterations within sendReport.
Mastra Instance
With all the pieces in place, we bring them together by creating a Mastra instance.
// mastra/index.ts
import { Mastra } from '@mastra/core/mastra';
import { reportWorkflow } from './workflows/report-workflow';
import { reportAgent } from './agents/report-agent';
import { env } from '../env';
import { logger } from '../utils/logger';

export const mastra = new Mastra({
  workflows: { reportWorkflow },
  agents: { reportAgent },
  logger: logger,
});
This instance is then used in our workflow’s main function, which gets triggered when we invoke the Lambda function.
// app.ts
import { mastra } from "./mastra";

export async function runWorkflow() {
    try {
        console.log('🚀 Starting reportWorkflow...');

        const run = await mastra.getWorkflow("reportWorkflow").createRunAsync();
        const runResult = await run.start({
            inputData: {}
        });

        if (runResult.status === 'success') {
            console.log('✅ Workflow executed successfully:');
            console.log(runResult.result);
            return runResult.result;
        } else if (runResult.status === 'failed') {
            console.error('❌ Workflow error:');
            console.error(runResult.error);
            throw new Error(`Workflow failed: ${runResult.status}`);
        }else {
            console.warn('⚠️ Unknown workflow status:', runResult.status);
            throw new Error(`Unknown workflow status: ${runResult.status}`);
        }
    } catch (error) {
        console.error('💥 Fatal error running workflow:', error);
        throw error;
    }

}
This is the handler function that will interact with the AWS Lambda ecosystem.
import { runWorkflow } from './app';

export const handler = async (event: any, context: any) => {
    console.log('Lambda function invoked');
    console.log('Event:', JSON.stringify(event, null, 2));
    console.log('Context:', JSON.stringify(context, null, 2));

    try {
        const result = await runWorkflow();

        return {
            statusCode: 200,
            headers: {
                "Content-Type": "application/json",
            },
            body: JSON.stringify({
                message: 'Workflow executed successfully!',
                result: result,
            }),
        };
    } catch (error) {

        console.error(' Error in handler:', error);

        return {
            statusCode: 500,
            headers: {
                "Content-Type": "application/json",
            },
            body: JSON.stringify({
                message: 'An error occurred during workflow execution.',
                error: error instanceof Error ? error.message : String(error),
            }),
        };
    }
};
Containerization
With the workflow ready, we package the solution in our Dockerfile.
# ---- Build Stage ----
FROM node:22-alpine AS builder
WORKDIR /usr/src/app
RUN corepack enable
COPY package.json pnpm-lock.yaml* ./
RUN pnpm install --frozen-lockfile
COPY . .
RUN pnpm run build
# ---- Runtime Stage ----
FROM public.ecr.aws/lambda/nodejs:22
WORKDIR ${LAMBDA_TASK_ROOT}
COPY /usr/src/app/dist ./
COPY /usr/src/app/node_modules ./node_modules
CMD [ "index.handler" ]That should cover the application. Let’s move on to the infrastructure.
Infrastructure
With all previous steps completed, we can now start building the AWS infrastructure using Terraform.
The following diagram shows the resources that we need to deploy.
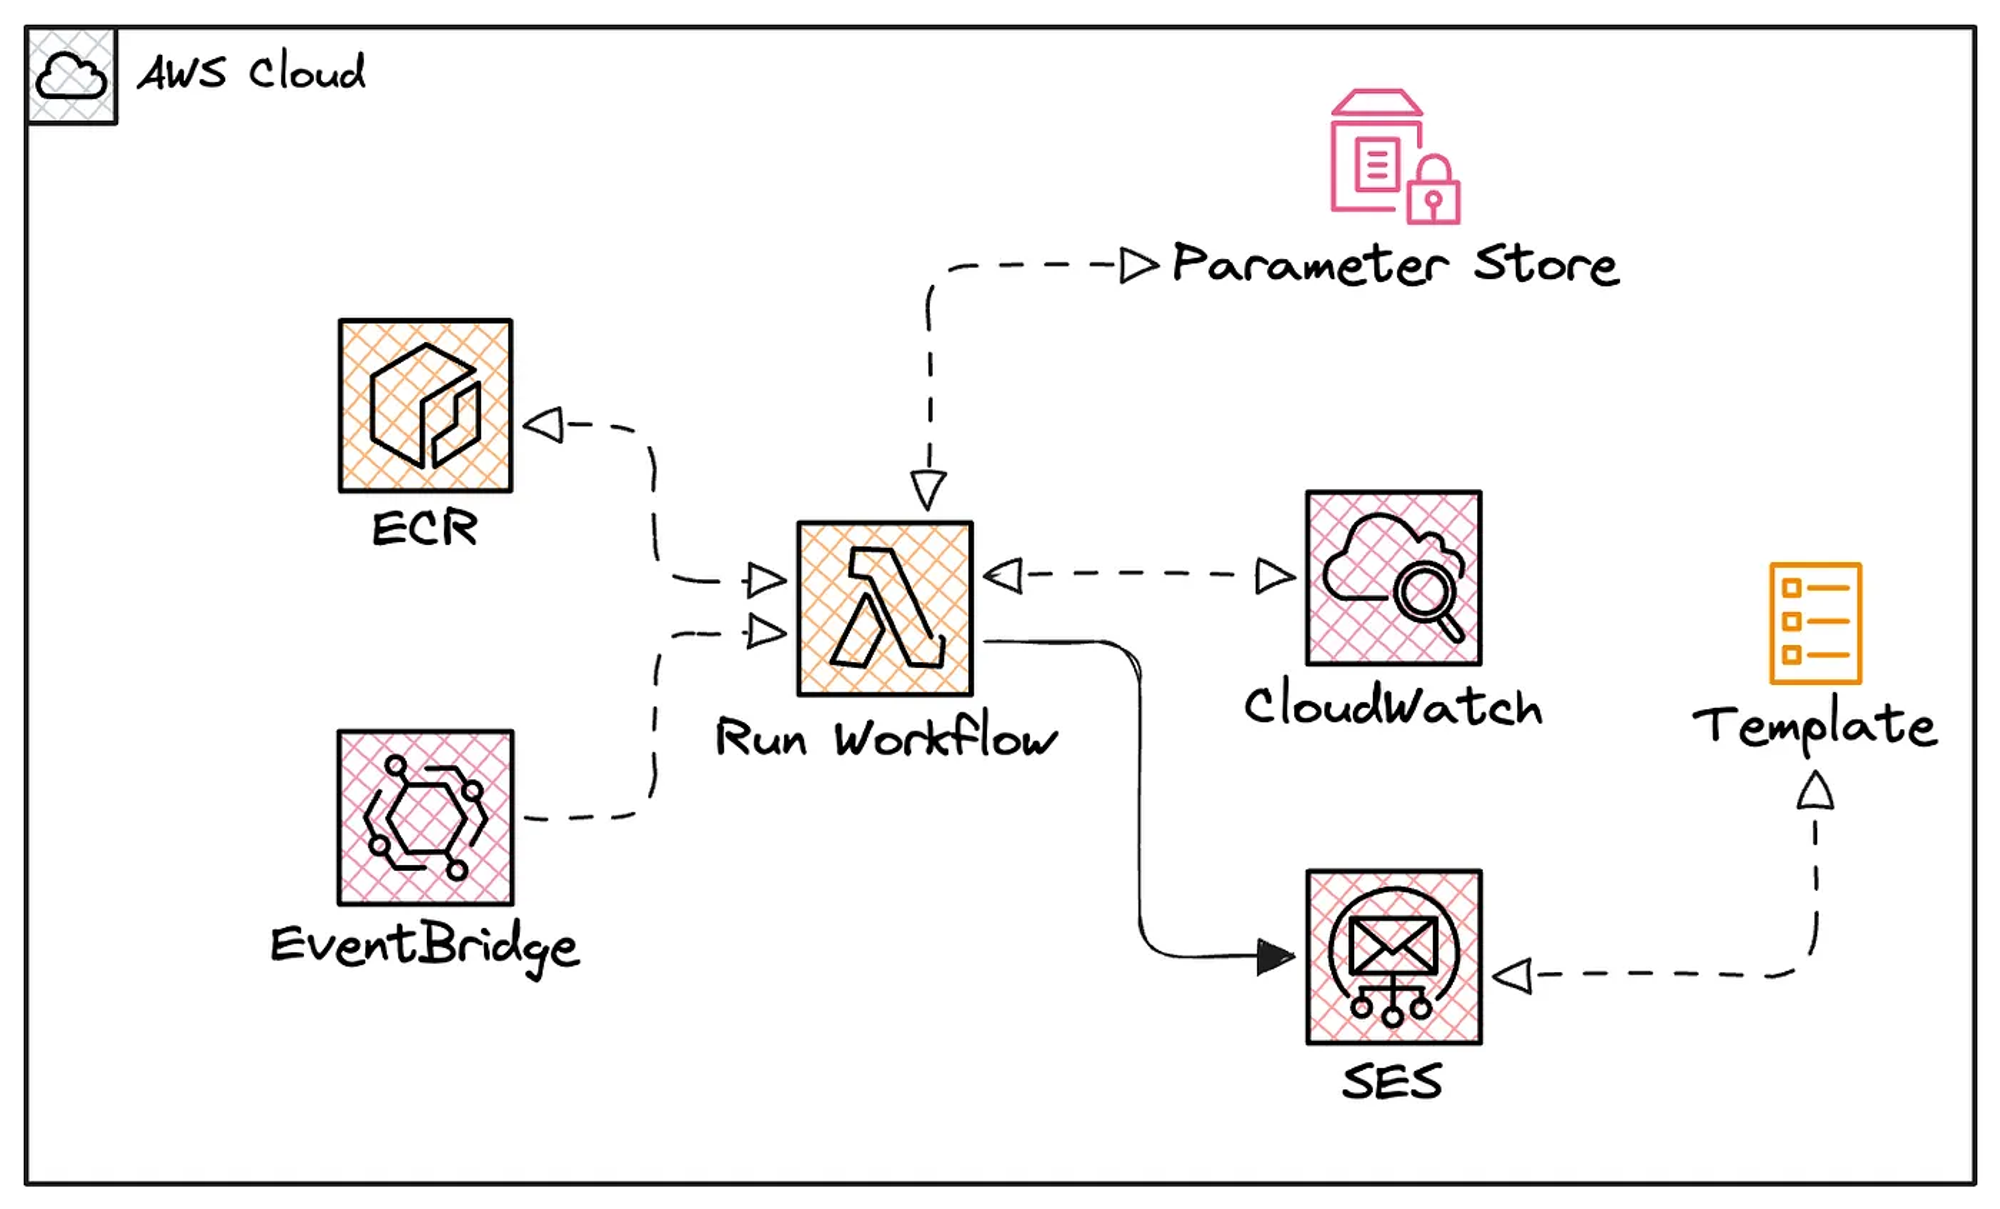
Press enter or click to view image in full size
To start, we’ll create an ECR to host the Docker images that will be used by Lambda.
ECR Repository
The first step is to create the ECR repository that will host the Docker images generated throughout the project’s lifecycle.
Additionally, upload a nodejs:22 image that will be used as the default when creating the project.
locals {
  ecr_name = "ecr-${local.project_name}"
}

## ECR Repository
resource "aws_ecr_repository" "warike_development_ecr" {
  name = local.ecr_name

  # security config
  image_tag_mutability = "IMMUTABLE_WITH_EXCLUSION"
  image_scanning_configuration {
    scan_on_push = true
  }
  encryption_configuration {
    encryption_type = "AES256"
  }

  # latest mutability config
  image_tag_mutability_exclusion_filter {
    filter      = "latest*"
    filter_type = "WILDCARD"

  }

  force_delete = true
}

## Upload nodejs:22
resource "null_resource" "seed_ecr_image" {
  provisioner "local-exec" {
    command = <<EOT
      aws ecr get-login-password --region ${local.aws_region} --profile ${local.aws_profile} \
        | docker login --username AWS --password-stdin ${data.aws_caller_identity.current.account_id}.dkr.ecr.${local.aws_region}.amazonaws.com

      docker pull public.ecr.aws/lambda/nodejs:22
      docker tag public.ecr.aws/lambda/nodejs:22 ${aws_ecr_repository.warike_development_ecr.repository_url}:latest
      docker push ${aws_ecr_repository.warike_development_ecr.repository_url}:latest
    EOT
  }

  depends_on = [aws_ecr_repository.warike_development_ecr]
}

## ECR - Output repository URL
output "ecr_repository_url" {
  value = aws_ecr_repository.warike_development_ecr.repository_url
}With the ECR ready, we are able to link it to the Lambda function. But first, we need to define an IAM Role for our function.
## IAM Policy Assume role
data "aws_iam_policy_document" "warike_development_lambda_assume_role" {
  statement {
    sid     = "1"
    actions = ["sts:AssumeRole"]
    principals {
      type        = "Service"
      identifiers = ["lambda.amazonaws.com"]
    }
  }
}

## IAM Role for Lambda
resource "aws_iam_role" "warike_development_lambda_role" {
  name               = "lambda-role-${local.project_name}"
  description        = "IAM role for Lambda"
  assume_role_policy = data.aws_iam_policy_document.warike_development_lambda_assume_role.json
}
Parameter Store
Additionally, we know the workflow requires environment variables from .envfile, we can store them in AWS SSM Parameter Store.
To use them as a file within the Lambda function, I’ve mapped them into a key-value structure.
locals {
  env_file = file("${path.module}/../workflow/.env")
  env_vars = {
    for line in split("\n", local.env_file) :
    split("=", line)[0] => split("=", line)[1]
    if length(trimspace(line)) > 0 && !startswith(trimspace(line), "#")
  }
}

# Create one SSM parameter per key/value
resource "aws_ssm_parameter" "warike_development_env_vars" {
  for_each    = local.env_vars
  name        = "/${local.project_name}/${each.key}"
  description = "Env var ${each.key} for ${local.project_name}"
  type        = "SecureString"
  value       = each.value
}Next.
CloudWatch
When a Lambda function is first invoked, AWS automatically creates a CloudWatch Logs log group for it. However, deleting the function does not delete the log group.
It’s recommended to manage log groups explicitly (including retention and deletion policies) to avoid leaving unused log groups behind.
## IAM role policy for Cloudwatch logging
data "aws_iam_policy_document" "warike_development_lambda_logging" {
  statement {
    effect = "Allow"
    actions = [
      "logs:CreateLogStream",
      "logs:PutLogEvents"
    ]
    resources = [
      "arn:aws:logs:*:*:log-group:/aws/lambda/${local.lambda_function_name}:*"
    ]
  }
}
## Cloudwatch Lambda logs IAM policy
resource "aws_iam_role_policy" "warike_development_lambda_logging" {
  name = "cloudwatch-${local.project_name}"
  role = aws_iam_role.warike_development_lambda_role.id

  policy = data.aws_iam_policy_document.warike_development_lambda_logging.json
}
## Cloudwatch log group
resource "aws_cloudwatch_log_group" "warike_development_lambda_logs" {
  name              = "/aws/lambda/${local.lambda_function_name}"
  retention_in_days = 7
}Lambda function
Finally, we define the Lambda function.
locals {
  lambda_function_name = "lambda-${local.project_name}"
}

## Lambda function workflow
resource "aws_lambda_function" "warike_development_lambda" {
  #config
  function_name = local.lambda_function_name
  timeout       = 900
  image_uri     = "${aws_ecr_repository.warike_development_ecr.repository_url}:latest"
  package_type  = "Image"
  role          = aws_iam_role.warike_development_lambda_role.arn

  logging_config {
    log_format            = "JSON"
    application_log_level = "INFO"
    system_log_level      = "WARN"
  }

  environment {
    variables = local.env_vars
  }

  lifecycle {
    ignore_changes = [image_uri]
  }

  depends_on = [
    aws_ecr_repository.warike_development_ecr,
    aws_ssm_parameter.warike_development_env_vars,
    aws_cloudwatch_log_group.warike_development_lambda_logs,
    null_resource.seed_ecr_image,
  ]
}EventBridge Rule
Since we need the lambda function to run on a specific schedule, a simple and cost-effective solution would be to use an EventBridge Rule.
We define a rule with the desired schedule, set our Lambda function as the target, and finally add the invocation permissions.
# EventBridge Rule to trigger
resource "aws_cloudwatch_event_rule" "warike_development_lambda_schedule" {
  name                = "lambda-schedule-${local.project_name}"
  description         = "Daily Run Lambda Function 03.00 hrs UTC"
  schedule_expression = "cron(0 03 * * ? *)"
}
# Target that connects the Rule with the API Destination
resource "aws_cloudwatch_event_target" "warike_development_lambda_http_target" {
  rule      = aws_cloudwatch_event_rule.warike_development_lambda_schedule.name
  target_id = "target_workflow_lambda"
  arn       = aws_lambda_function.warike_development_lambda.arn

  input = jsonencode({
    inputData = {}
  })
}
## Allow Eventbridge <> Lambda
resource "aws_lambda_permission" "warike_development_allow_eventbridge" {
  statement_id  = "AllowExecutionFromEventBridge"
  action        = "lambda:InvokeFunction"
  function_name = aws_lambda_function.warike_development_lambda.function_name
  principal     = "events.amazonaws.com"
  source_arn    = aws_cloudwatch_event_rule.warike_development_lambda_schedule.arn
}
Deployment automation
To complete the deployment, I’ll set up a GitHub workflow to automate the process. We need to map all the Actions secrets in our GitHub repository.
You can also map them manually if preferred.
locals {
gh = {
repository_name = local.project_name
owner = local.gh_owner
}
gh_secrets = {
PROJECT_NAME = local.project_name
AWS_REGION = local.aws_region
AWS_ECR_REPOSITORY = aws_ecr_repository.warike_development_ecr.repository_url
AWS_IAM_ROLE_ARN = aws_iam_role.warike_development_github_iam_role.arn
AWS_LAMBDA_FUNCTION_NAME = aws_lambda_function.warike_development_lambda.function_name
AWS_LAMBDA_FUNCTION_ROLE_ARN = aws_iam_role.warike_development_lambda_role.arn
}
}
data "github_repository" "main" {
full_name = "${local.gh.owner}/${local.gh.repository_name}"
}
## Github secrets
resource "github_actions_secret" "secrets" {
for_each = local.gh_secrets
repository = data.github_repository.main.name
secret_name = each.key
plaintext_value = each.value
depends_on = [
github_repository.main,
aws_ecr_repository.warike_development_ecr,
aws_iam_role.warike_development_github_iam_role,
aws_lambda_function.warike_development_lambda
]
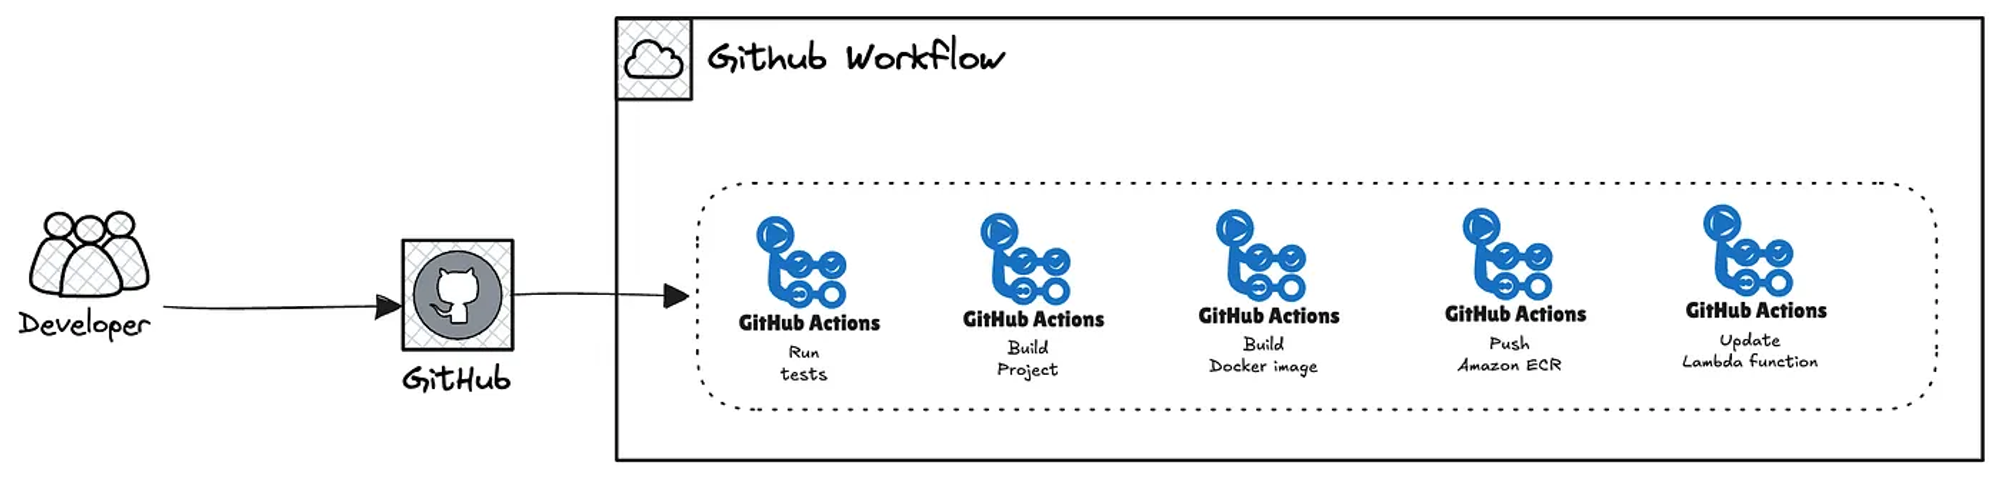
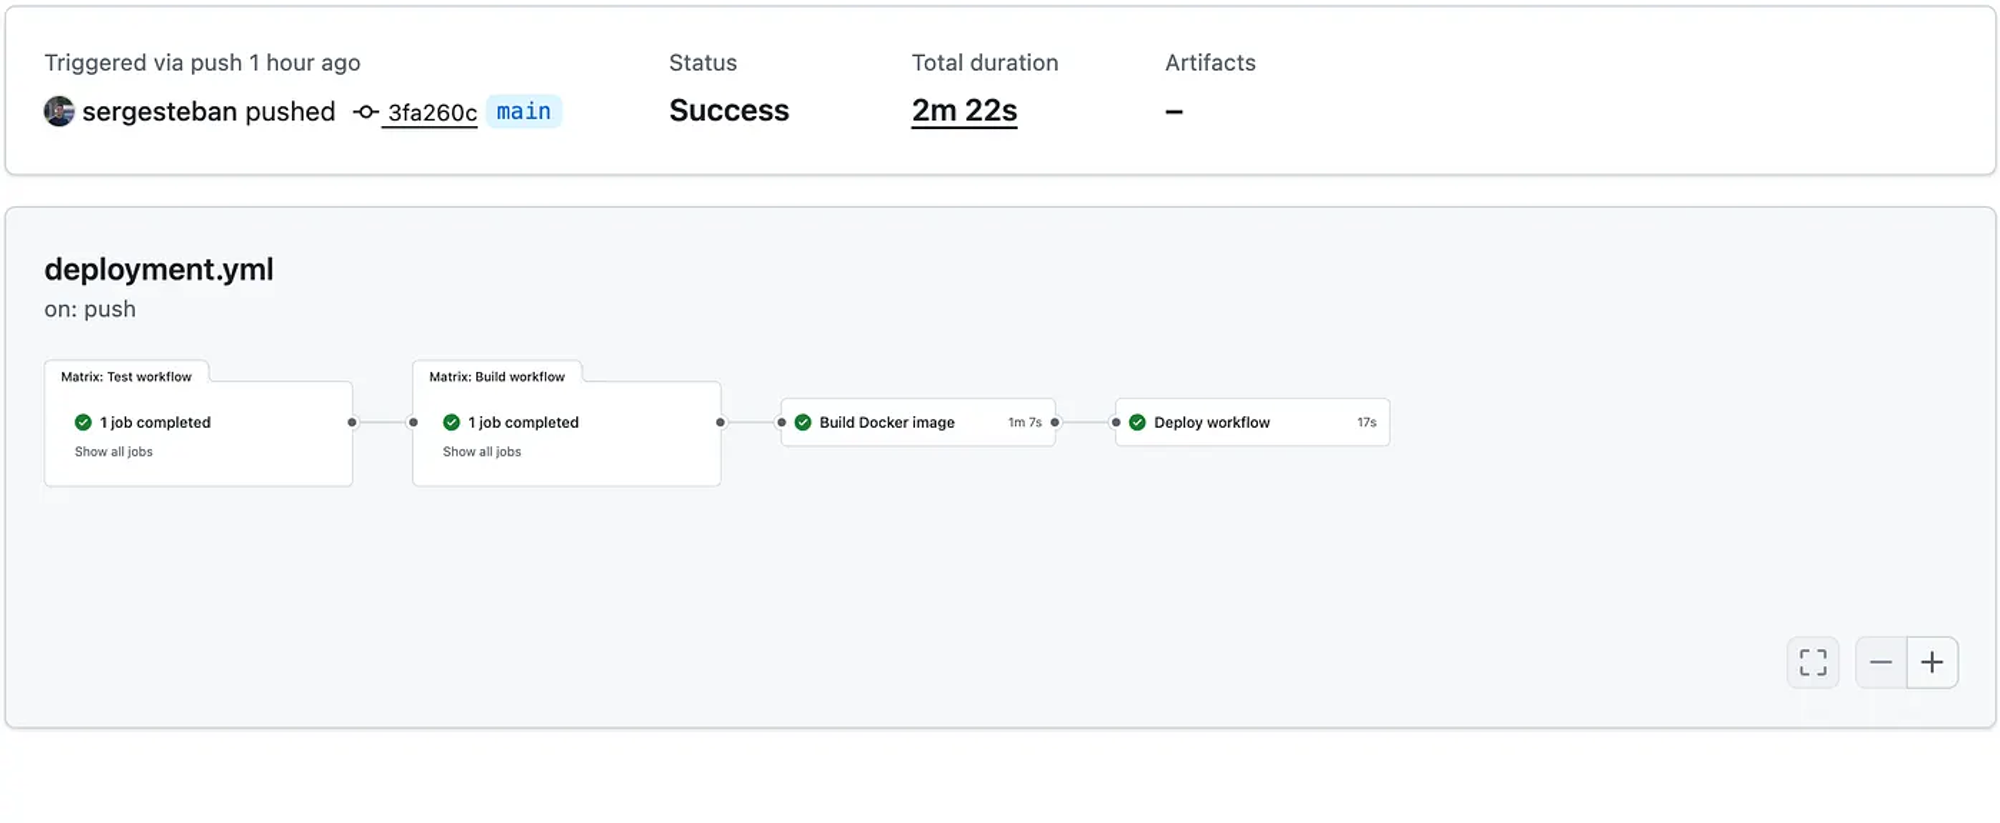
}Github workflow
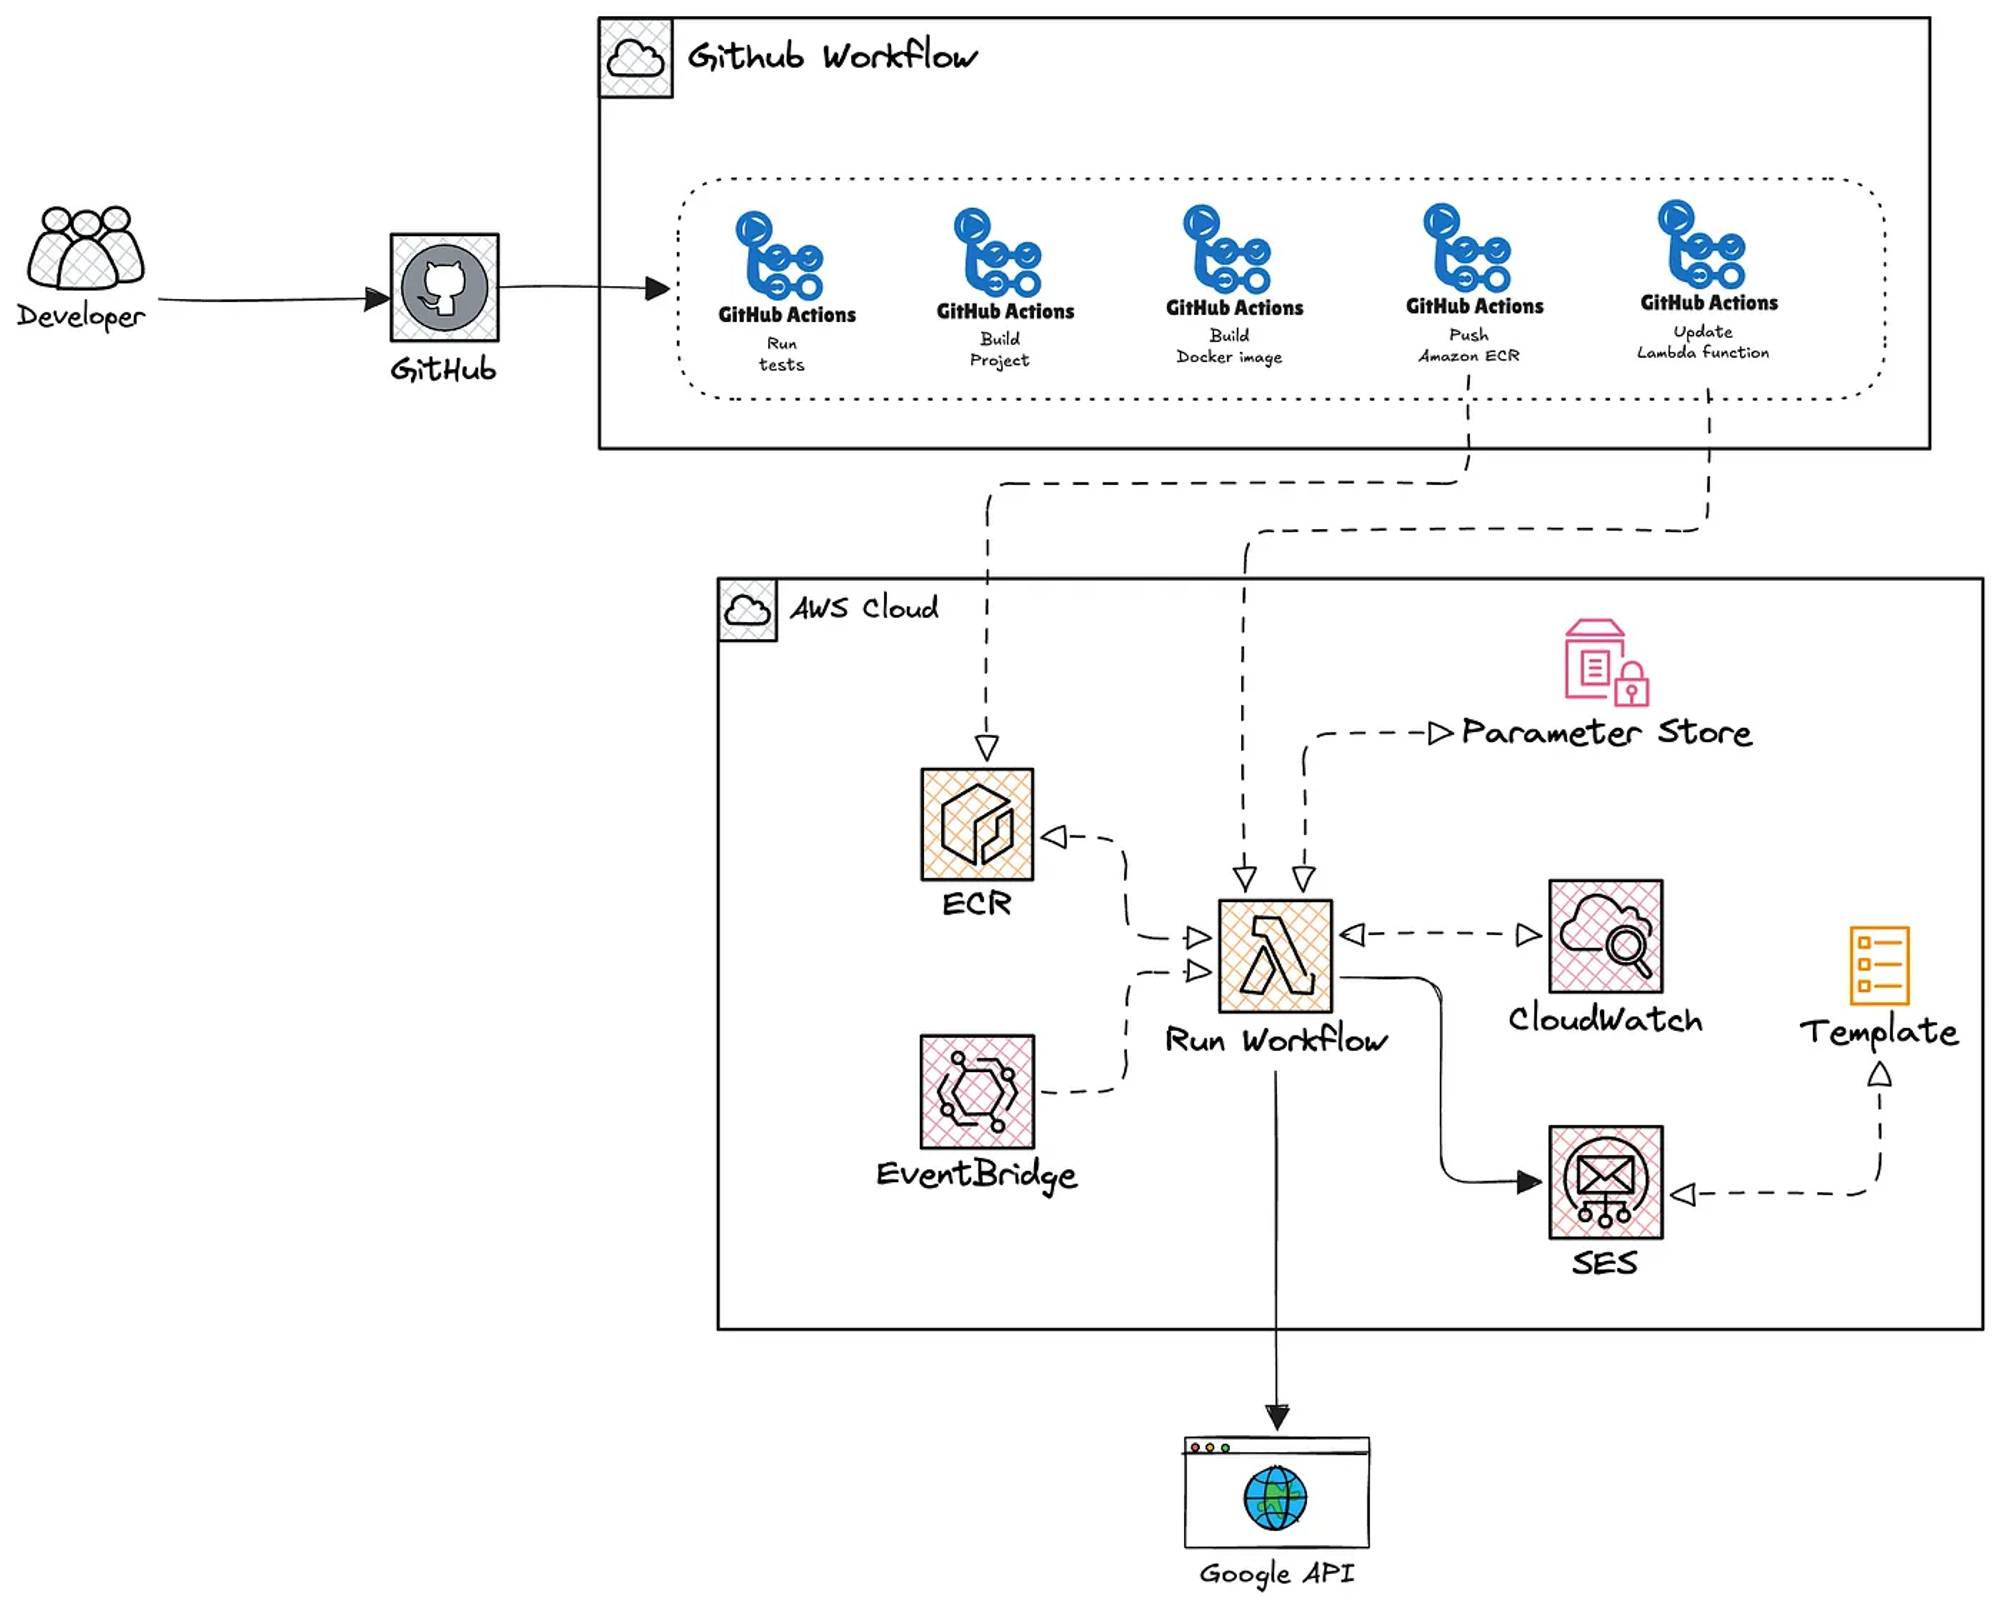
The following diagram provides a high-level view of what we’re going to implement.
Before defining the GitHub workflow pipeline, we need to be aware that an OpenID Connect provider and its corresponding IAM policies are required.
## Github - OIDC provider
resource "aws_iam_openid_connect_provider" "warike_development_github" {
  # config
  url            = "https://token.actions.githubusercontent.com"
  client_id_list = ["sts.amazonaws.com"]
}

## IAM Policy OIDC
data "aws_iam_policy_document" "warike_development_github_oidc" {
  statement {
    effect  = "Allow"
    actions = ["sts:AssumeRoleWithWebIdentity"]
    principals {
      type        = "Federated"
      identifiers = [aws_iam_openid_connect_provider.warike_development_github.arn]
    }
    condition {
      test     = "StringLike"
      variable = "token.actions.githubusercontent.com:sub"
      values   = ["repo:${local.gh_owner}/${local.gh.repository_name}:ref:refs/heads/*"]
    }
    condition {
      test     = "StringEquals"
      variable = "token.actions.githubusercontent.com:aud"
      values   = ["sts.amazonaws.com"]
    }
  }
}

## Github - IAM role
resource "aws_iam_role" "warike_development_github_iam_role" {
  name               = "github-iam-role-${local.project_name}"
  description        = "IAM role for github actions to interact with AWS resources"
  assume_role_policy = data.aws_iam_policy_document.warike_development_github_oidc.json
}
## IAM Policy for Github workflow
data "aws_iam_policy_document" "warike_development_github_workflow" {
  statement {
    effect = "Allow"
    actions = [
      "ecr:GetAuthorizationToken"
    ]
    resources = ["*"]
  }
  statement {
    actions = [
      "ecr:BatchCheckLayerAvailability",
      "ecr:GetDownloadUrlForLayer",
      "ecr:BatchGetImage",
      "ecr:PutImage",
      "ecr:InitiateLayerUpload",
      "ecr:UploadLayerPart",
      "ecr:CompleteLayerUpload",
      "ecr:ListImages",
      "ecr:DescribeImages",
      "ecr:GetLifecyclePolicy",
      "ecr:GetLifecyclePolicyPreview",
      "ecr:GetRepositoryPolicy",
      "ecr:DescribeRepositories",
      "ecr:ListRepositories"
    ]
    effect = "Allow"
    resources = [
      aws_ecr_repository.warike_development_ecr.arn,
      "arn:aws:ecr:${local.aws_region}:${data.aws_caller_identity.current.account_id}:repository/${local.gh_owner}/${local.gh.repository_name}",
    ]
  }
  statement {
    effect = "Allow"
    actions = [
      "lambda:UpdateFunctionCode",
      "lambda:GetFunction",
      "lambda:GetFunctionConfiguration"
    ]
    resources = [
      aws_lambda_function.warike_development_lambda.arn
    ]
  }
  statement {
    effect = "Allow"
    actions = [
      "iam:PassRole"
    ]
    resources = [
      aws_iam_role.warike_development_lambda_role.arn
    ]
  }
}

## Github - IAM Policy
resource "aws_iam_policy" "warike_developmente_ecr_iam_policy" {
  # config
  name        = "ecr-policy-${local.project_name}"
  description = "Allows github actions to pull and push images ECR, and lambda updates"
  policy      = data.aws_iam_policy_document.warike_development_github_workflow.json
}

## Attach policy to role
resource "aws_iam_role_policy_attachment" "warike_development_github_iam_policy_attachment" {
  role       = aws_iam_role.warike_development_github_iam_role.name
  policy_arn = aws_iam_policy.warike_developmente_ecr_iam_policy.arn
}We apply the changes using Terraform.
terraform apply
...
Apply complete! Resources: 27 added, 0 changed, 0 destroyed.
With all the pieces in place, we can create the pipeline.
name: CI - Mastra workflow

on:
  push:
    branches: [main, master]
    paths:
      - 'workflow/**'
      - '.github/workflows/**'
  pull_request:
    branches: [main, master]
    paths:
      - 'workflow/**'
      - '.github/workflows/**'
env:
  NODE_VERSION: 22
  PNPM_VERSION: 10
  AWS_REGION: ${{ secrets.AWS_REGION }}
  ECR_REPOSITORY: ${{ secrets.AWS_ECR_REPOSITORY }}
  PROJECT_NAME: ${{ secrets.PROJECT_NAME }}
  AWS_ROLE_ARN: ${{ secrets.AWS_IAM_ROLE_ARN }}
  AWS_LAMBDA_FUNCTION_NAME: ${{ secrets.AWS_LAMBDA_FUNCTION_NAME }}
  AWS_LAMBDA_FUNCTION_ROLE_ARN: ${{ secrets.AWS_LAMBDA_FUNCTION_ROLE_ARN }}

jobs:
  tests:
    name: Test workflow
    runs-on: ubuntu-latest

    defaults:
      run:
        working-directory: ./workflow

    strategy:
      matrix:
        node-version: [22]
        pnpm-version: [10]
    steps:
      - name: Checkout Repository
        uses: actions/checkout@v4

      - name: Install pnpm
        uses: pnpm/action-setup@v4
        with:
          version: ${{ matrix.pnpm-version }}

      - name: Use Node.js ${{ matrix.node-version }}
        uses: actions/setup-node@v4
        with:
          node-version: ${{ matrix.node-version }}
          cache: 'pnpm'
          cache-dependency-path: workflow/pnpm-lock.yaml

      - name: Install Dependencies
        run: pnpm install --frozen-lockfile

      - name: Scan for critical vulnerabilities
        run: pnpm audit --audit-level=critical

      - name: Run Tests
        env:
          DOTENV_QUIET: true
          GOOGLE_GENERATIVE_AI_API_KEY: "example-api-key"
        run: pnpm test:ci
  build:
    name: Build workflow
    needs: tests
    runs-on: ubuntu-latest

    defaults:
      run:
        working-directory: ./workflow

    strategy:
      matrix:
        node-version: [22]
        pnpm-version: [10]

    steps:
      - name: Checkout Repository
        uses: actions/checkout@v4

      - name: Install pnpm
        uses: pnpm/action-setup@v4
        with:
          version: ${{ matrix.pnpm-version }}

      - name: Use Node.js ${{ matrix.node-version }}
        uses: actions/setup-node@v4
        with:
          node-version: ${{ matrix.node-version }}
          cache: 'pnpm'
          cache-dependency-path: workflow/pnpm-lock.yaml

      - name: Install Dependencies
        run: pnpm install --frozen-lockfile

      - name: Build
        working-directory: ./workflow
        run: pnpm run build
  build-docker:
    name: Build Docker image
    needs: build
    runs-on: ubuntu-latest
    outputs:
      sha: ${{ steps.vars.outputs.sha }}
    permissions:
      id-token: write
      contents: read

    steps:
      - name: Checkout Repository
        uses: actions/checkout@v4

      - name: Configure AWS credentials
        uses: aws-actions/configure-aws-credentials@v4
        with:
          role-to-assume: ${{ env.AWS_ROLE_ARN }}
          aws-region: ${{ env.AWS_REGION }}
      - name: Login to Amazon ECR
        id: login-ecr
        uses: aws-actions/amazon-ecr-login@v1
        with:
          mask-password: 'true'

      - name: Set commit-sha
        id: vars
        run: |
          calculatedSha=$(git rev-parse --short ${{ github.sha }})
          echo "sha=${calculatedSha}" >> $GITHUB_OUTPUT

      - name: Build image and push to ECR
        working-directory: ./workflow
        env:
          DOCKER_IMAGE: ${{env.ECR_REPOSITORY}}:${{steps.vars.outputs.sha}}
        run: |
          echo "Building ${{env.DOCKER_IMAGE}}"
          docker build -t ${{env.DOCKER_IMAGE}} .
          docker tag "${{env.DOCKER_IMAGE}}" "${{env.ECR_REPOSITORY}}:latest"
          docker push ${{env.DOCKER_IMAGE}}
          docker push "${{env.ECR_REPOSITORY}}:latest"
  deploy-lambda:
    name: Deploy workflow
    runs-on: ubuntu-latest
    needs: build-docker
    permissions:
      id-token: write
      contents: read

    defaults:
      run:
        working-directory: ./workflow
    steps:
      - name: Checkout Repository
        uses: actions/checkout@v4

      - name: Configure AWS credentials
        uses: aws-actions/configure-aws-credentials@v4
        with:
          role-to-assume: ${{ env.AWS_ROLE_ARN }}
          aws-region: ${{ env.AWS_REGION }}

      - name: Deploy Lambda Function
        uses: aws-actions/aws-lambda-deploy@v1.1.0
        with:
          function-name: ${{ env.AWS_LAMBDA_FUNCTION_NAME }}
          package-type: Image
          image-uri: ${{ env.ECR_REPOSITORY }}:${{ needs.build-docker.outputs.sha }}
          role:  ${{ env.AWS_LAMBDA_FUNCTION_ROLE_ARN }}
I’ll use Act to test everything locally and ensure it’s working correctly.
$ act -j build --container-architecture linux/amd64
...
[CI - Mastra workflow/Build workflow] Cleaning up container for job Build workflow
[CI - Mastra workflow/Build workflow]   ✅  Success - Complete job
[CI - Mastra workflow/Build workflow] 🏁  Job succeeded
By committing our changes, we can verify that everything is operational.
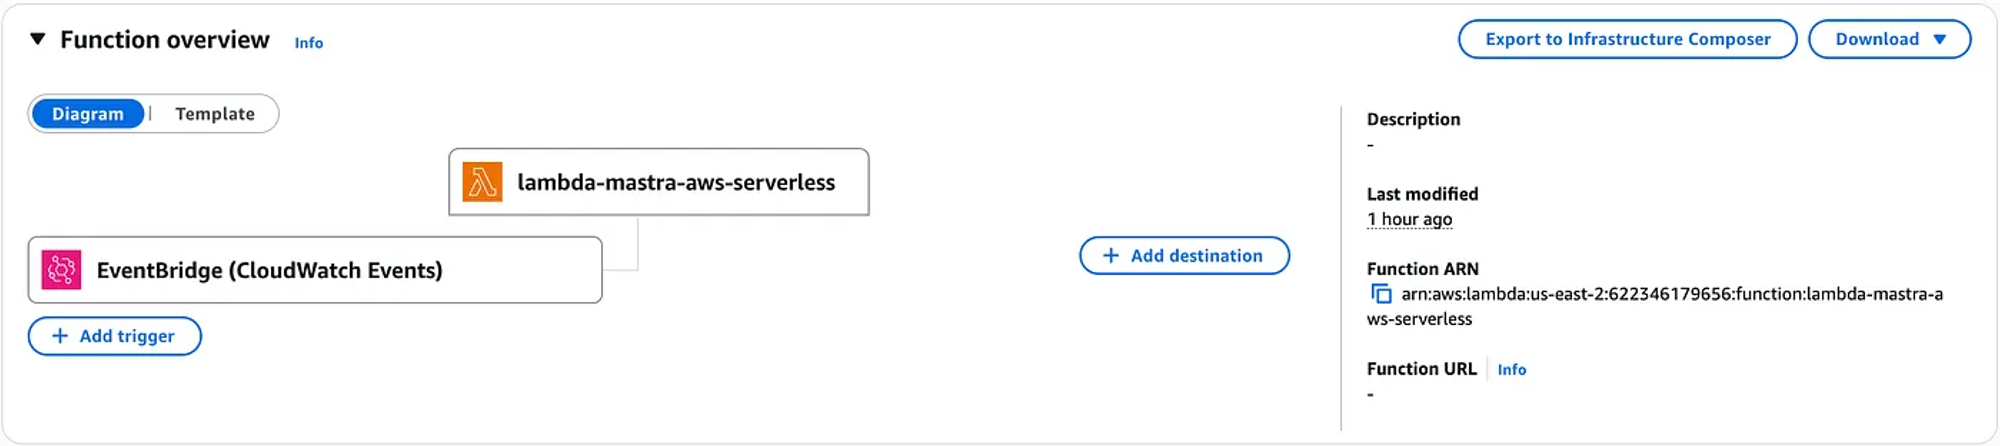
Testing
There are different ways to test; the most straightforward is to verify that the Lambda function is invoked. That means we should be able to see the function we created in the AWS console.
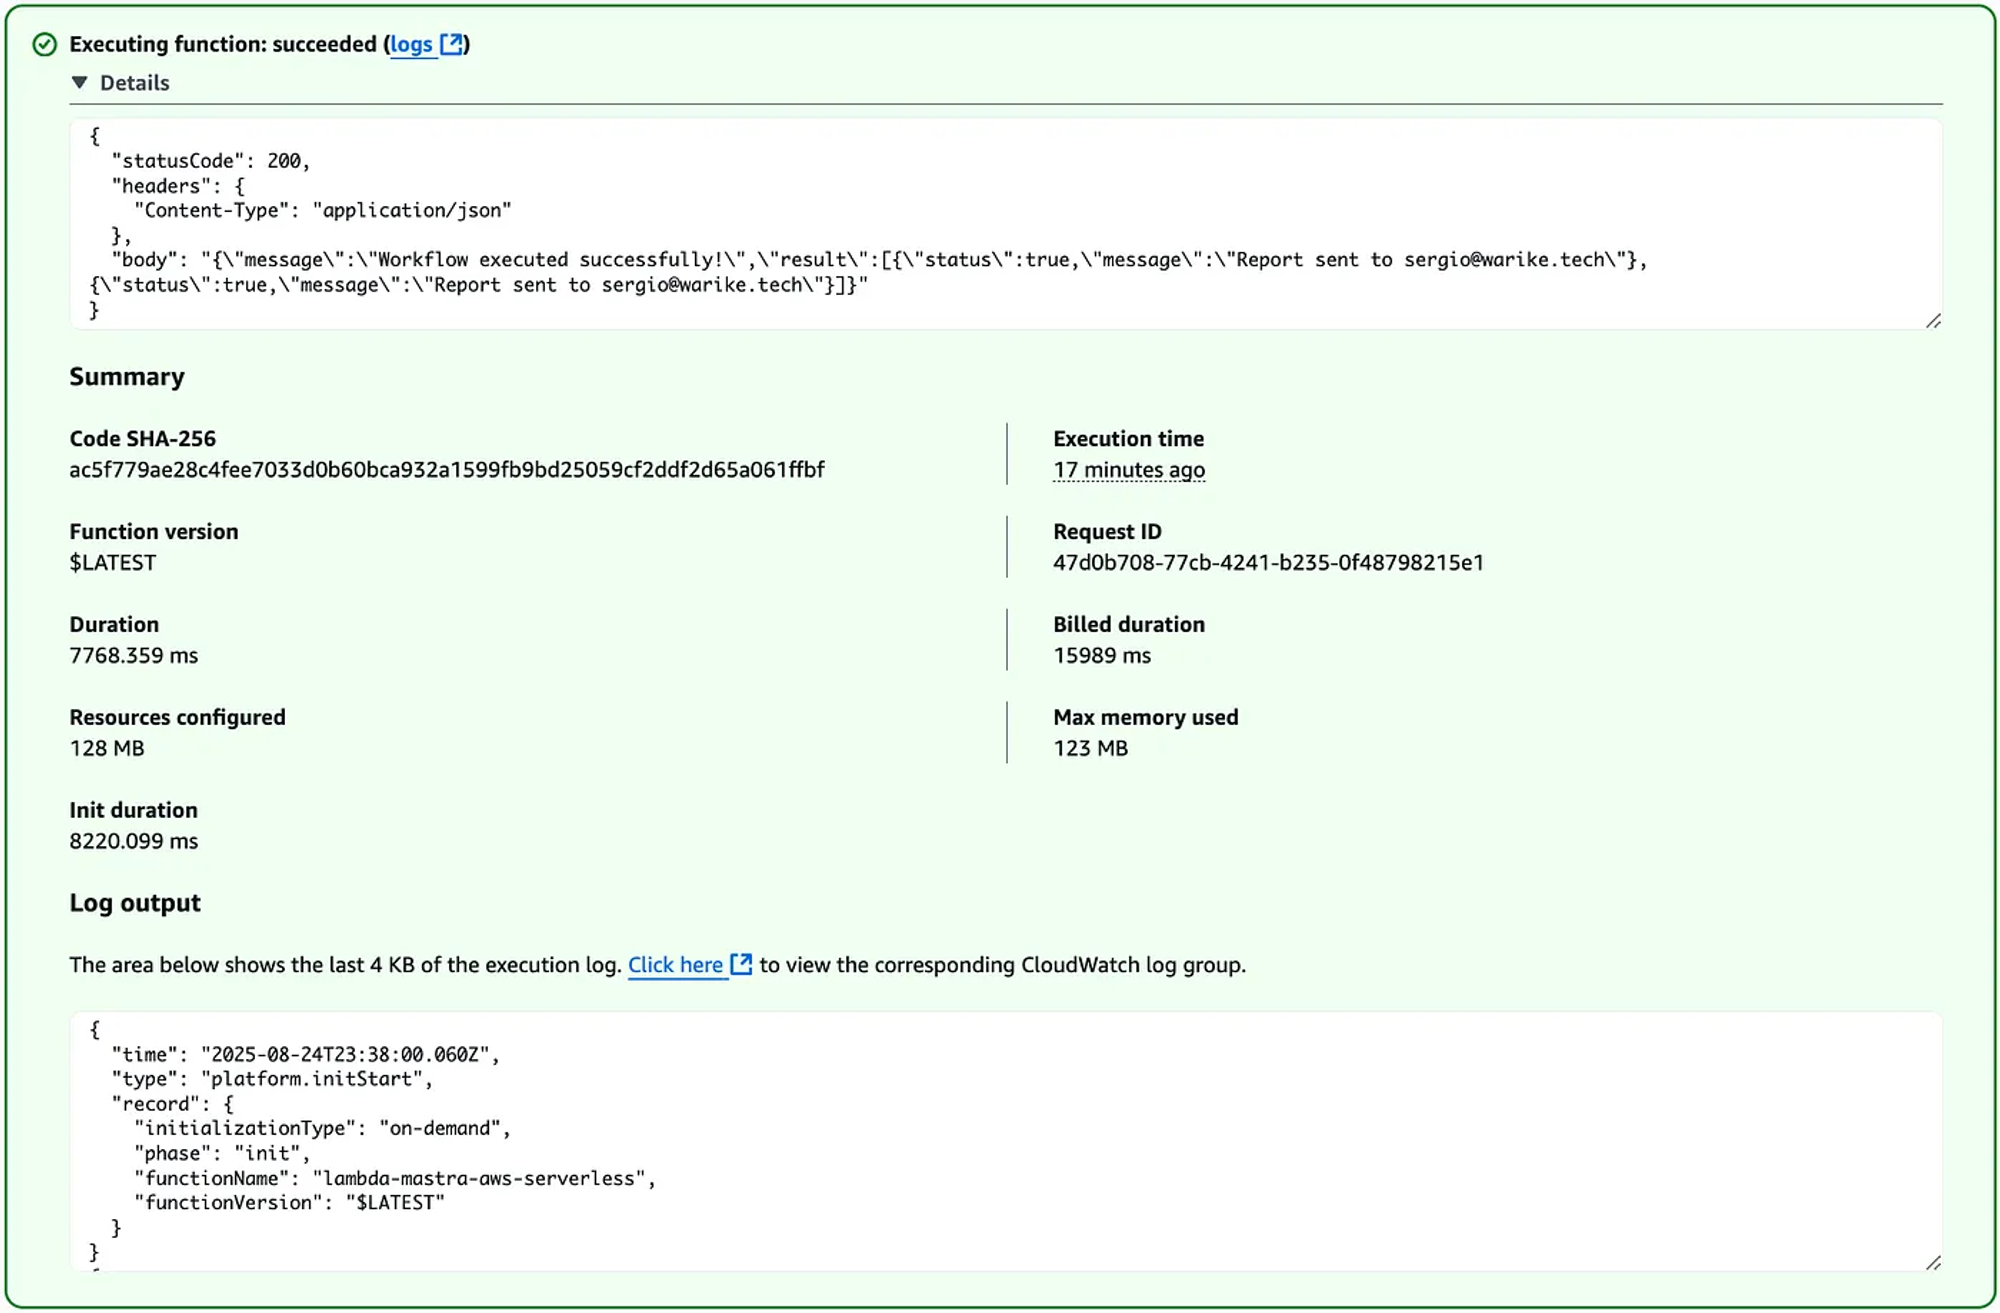
We can use the test event functionality.
And check the logs in CloudWatch.
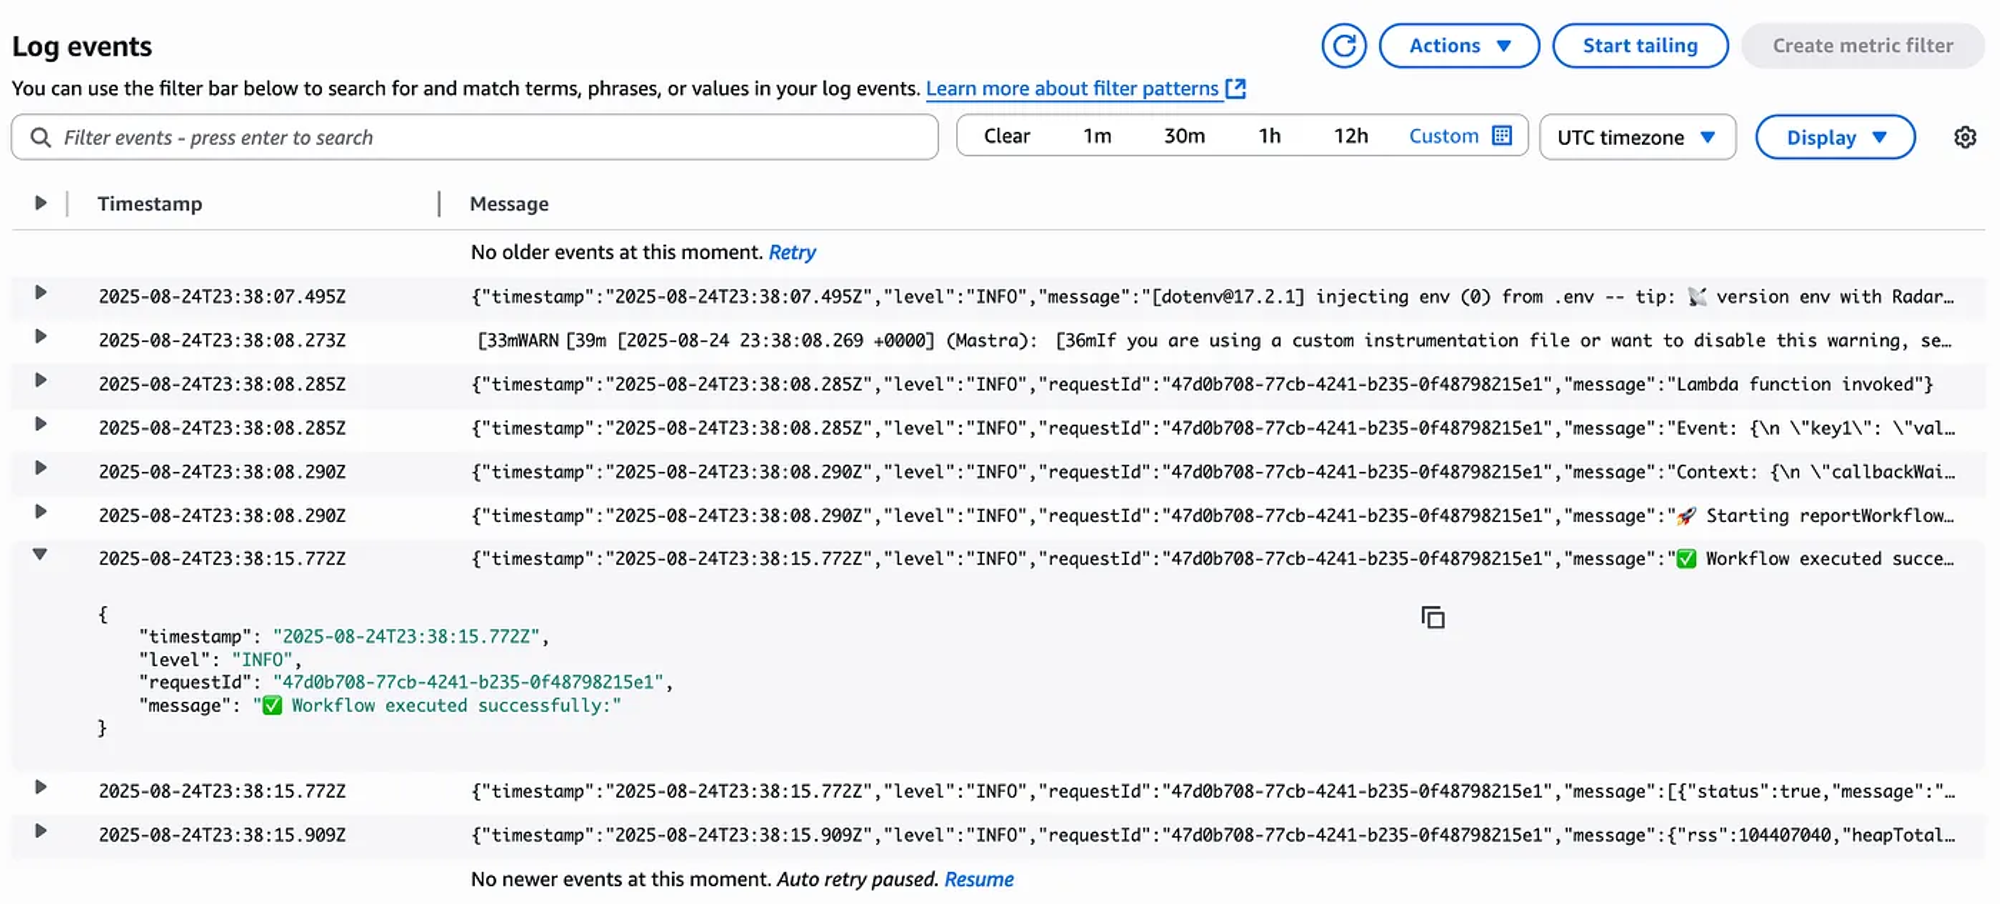
I see this as a successful implementation.
Cost breakdown
Let’s consider 1,000 emails per month and take a look at the costs of each service.
AWS Lambda
One run per month, the usage is so low it doesn’t even come close to the free tier limits of 1 million requests and 400,000 GB-seconds of compute time. Cost: $0.00
Amazon SES
Sending about 30,000 emails a month by a Lambda function, we get a special free tier that includes 62,000 emails per month. This easily covers our usage. Cost: $0.00
Amazon EventBridge
This service runs the schedule that kicks off our function once a month. This kind of minimal usage is completely free. Cost: $0.00
Amazon CloudWatch
Aa single 36 KB log file per event, it stays within the free 5 GB of log storage. Cost: $0.00
AWS Systems Manager Parameter Store
Storing three simple parameters is free. Cost: $0.00
Based on the usage breakdown, the total estimated monthly cost for this architecture should be $0.00.
Please notice that I am not considering inference costs.
Conclusions
Overall, deploying a basic agentic workflow using Mastra was quite straightforward. Even without diving into the specifics of what the agent generates, it’s clear that AWS provides deployment conveniences, and Mastra ensures seamless integration.
- It’s important to note that, in this setup, all the logic is packaged into a single Lambda. This limits our ability to fully leverage Lambda’s scaling features when using Mastra’s
.foreach()function.
- An alternative approach would be to break the workflow into separate parts, taking advantage of Mastra features like
nested workflows, andsuspend & resume.
Nevertheless, after implementing the Mastra workflow, it’s clear that by leveraging tools like Terraform for infrastructure management, Docker for application packaging, and GitHub Actions for deployment automation, a robust, scalable, and fully integrated solution within the AWS ecosystem can be achieved.